
Building Checklists and the Node System
6 min read
- Accessing the Checklist Editor
- Adding Questions/Answers
- Top Left Menu Bar
- Top Center Menu Bar
- Modifying Node Text
- Question Node Toolbars
- Answer Node Toolbars
- Connecting Nodes
- Grouping Nodes
- Editing Node Colors
- Importing/Exporting Checklists
- Backing Up/Restoring Checklists
- Reordering Nodes & Checklists
- Editor Shortcut (Hot) Keys
- Building Checklists (Video)
Once you have created your first set of checklists, you will then need to edit them and build out your trading system via the “node style” question and answer system.
Accessing the Checklist Editor #
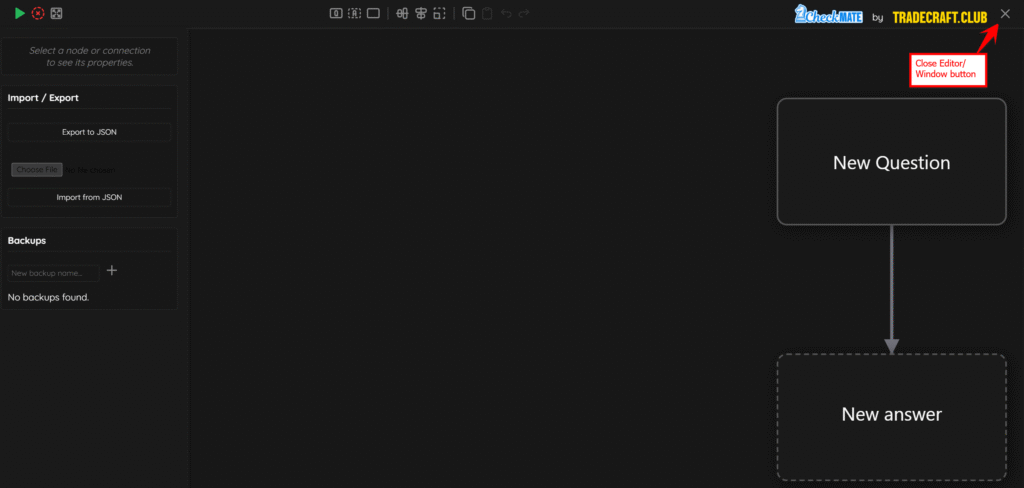
Either from the Daily Trades screen or the settings screen, expand the checklist that you wish to modify, then click the edit (pencil) icon. A new window will appear that will allow you to build your checklist system. This window can be closed by clicking the X in the top right corner.
Adding Questions/Answers #
Upon opening the checklist editor for the first time, you will see “New Question” and “New Answer” boxes already present. Note that question nodes have a solid box around them, and answer nodes of a dashed box around them.
Top Left Menu Bar #
The top left menu bar contains 3 icons that allow for better management of the canvas. The play button will run the checklist, the Red X in a circle clears the canvas (deletes everything on the screen), and the square with arrows in it will fit the canvas to screen, which allows you to fit your entire canvas on the screen and ensure all nodes are visible.

Top Center Menu Bar #
Along the top of the editor is a menu bar. This menu bar contains several functions that allow you to add/remove and modify content on the editor canvas, as well as copy, paste and undo/redo the last commands. Hovering over any icon will tell you what it does.

From left to right:
- Add Question Node – Adds a question node.
- Add Answer Node – Adds an answer node.
- Add Empty Passthrough Node – Adds a passthrough node.
- Align Horizontally – Allows you to align all nodes horizontally in 1 row.
- Align Vertically – Allows you to align all nodes vertically in 1 row.
- Restore Default Size – If you manually resize a node, this will restore that node to its default size.
- Copy – Allows for copying of node(s)
- Paste – Allows for pasting of node(s).
- Undo – Undoes the last change/command (Control + Z).
- Redo – Redoes the last change/command (Control + Shift + Z).
Modifying Node Text #
To modify the text within a node, double click on the center (there should already be text in place) and then type in the new text you wish to use for that node.
Question Node Toolbars #
When you hover over a question node, different symbols appear that have different functions. Below are what each of these does.
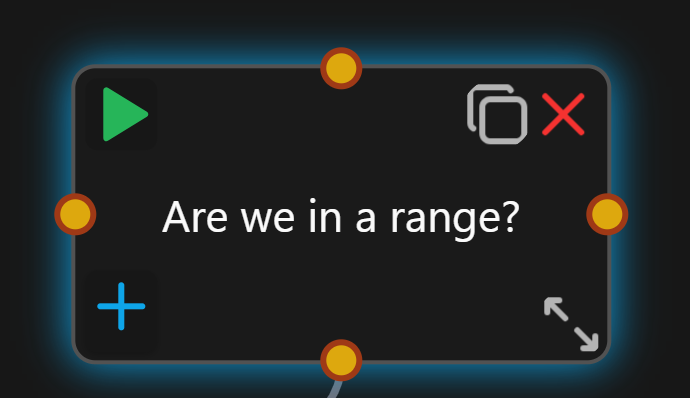
- The top left, green play icon will run this node (not the entire checklist; just this node).
- In the right corner, the first icon duplicates the node.
- The red x will delete the node.
- The bottom left blue plus icon duplicates the answer node, but has the arrow already attached, and will alternate between question and answer.
- The bottom right icon allows you to expand the node and make it larger (left click and drag).
Answer Node Toolbars #
When you hover over an answer node, different symbols appear that have different functions. Below are what each of these does.
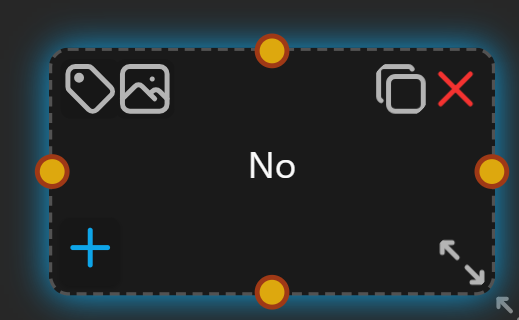
- The icon in the top left that looks like a tag allows you to add tags to the node.
- The picture icon allows you to add an image/screenshot to the node. When you hover over this icon, you will see the image that was attached. You will also see this image attached when viewing the checklist from the Daily Trades section.
- In the right corner, the first icon duplicates the node.
- The red x will delete the node.
- The bottom left blue plus icon duplicates the answer node, but has the arrow already attached, and will alternate between question and answer.
- The bottom right icon allows you to expand the node and make it larger (left click and drag).
Connecting Nodes #
Once you have created a few nodes, you will likely want to connect them, especially for Yes/No questions. To connect nodes:
- Highlight over the first node
- Orange circles will appear around the edge of the node, left click on the circle. A blue line will appear under your cursor.

- Move your cursor over the to the node that you wish to connect the first node and when the orange dots appear, left click on the orange dot that you wish to use to connect to the first node.

The nodes are now connected. You do not need to click and drag with your cursor; a single left click on the first yellow dot and then a single left click on the second yellow dot will establish the connection.
Once the nodes are connected, a solid red line will appear. You can left click on this line and press the delete key to remove the line.
Grouping Nodes #
Grouping nodes will visually help to stay organized as you build out your checklists. They do not have any function other than to make it easier to see different groups. It also makes it easier to move around different nodes, as they will be grouped together and will move as one unit.
To group nodes, left click the canvas and click and drag to highlight the nodes that you wish to group. Once a group has been highlighted, a blue dotted line and blue highlighting will appear to show that the nodes are now in a group. You can then rename this group by clicking on the word group in the top left corner, then double clicking on the ‘New Group’ text.
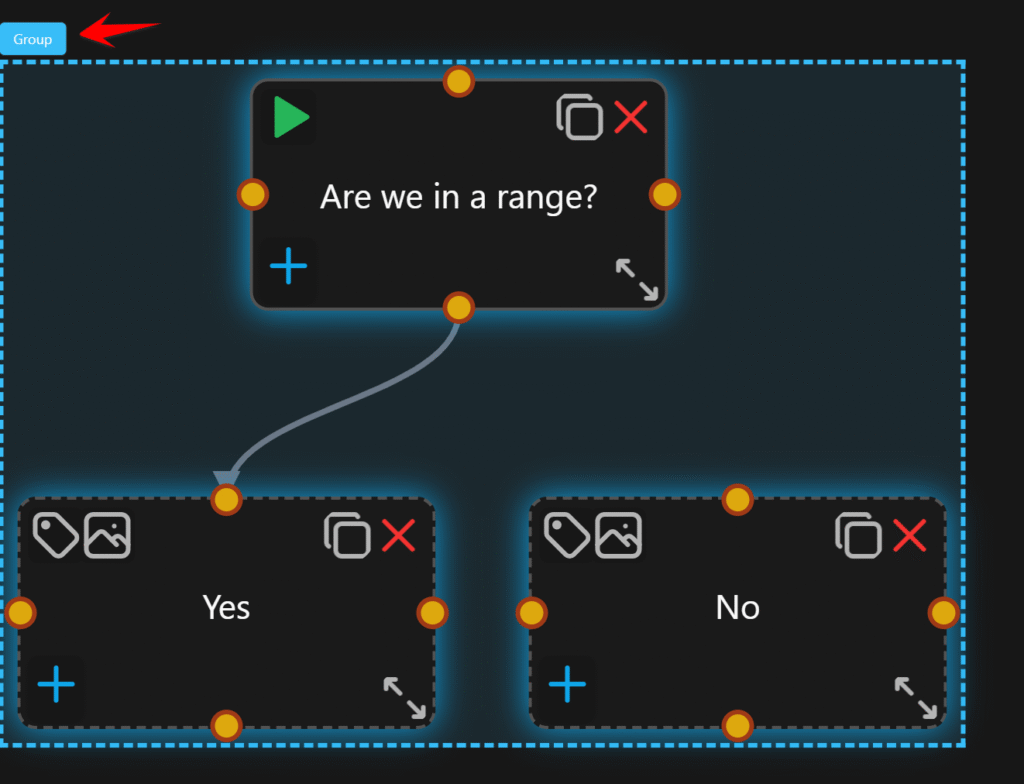
To remove the group, simply click the X in the right corner of the group and it will be ungrouped.
Editing Node Colors #
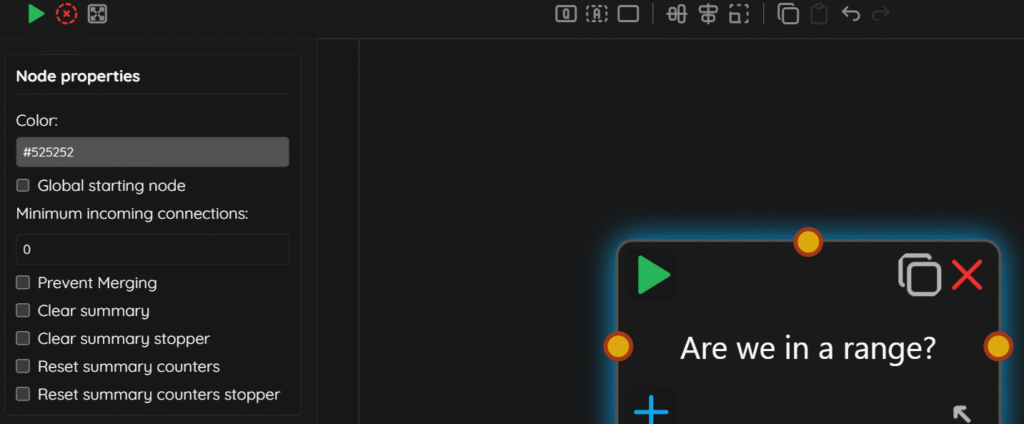
If you click on a node, you will notice a ‘Node Properties’ panel on the left side of the screen. This panel allows you to adjust settings such as the border color of the node, as well as more advanced functions. The colors changed in here will be visible in the checklist on the Daily Trades section, as well as under settings.
Importing/Exporting Checklists #
On the left panel, whether you have a node highlighted or not, you will see an import and export section. You can use this to export your checklist as a .json file for backup, but also to share it with another TradeCraft user. Conversely, you can import a .json checklist file from another TradeCraft user, or from a backup.

Backing Up/Restoring Checklists #
Aside from using the import/export feature, CheckMate has a built-in backup option that allows the user to save backups of their checklists to our servers. On the left panel, whether you have a node highlighted or not, you will see ‘Backups’. Enter a name into the ‘New backup name’ field, then click the plus icon. This will take a backup of your checklists at that point in time, and you will see it listed below.
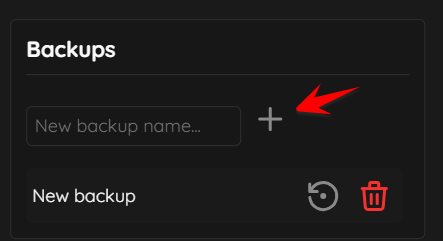
If you need to restore a checklist, simply click the restore icon (to the left of the trashcan/delete icon). You will be asked if you wish to overwrite your current checklist. Click ok and the checklist will be restored. If you wish to delete a backup, click the trashcan icon.
Reordering Nodes & Checklists #
If you wish to reorder your checklists, simply click and drag the checklists to the location where you wish to have it. This can be done from any screen where the checklists are located.
Editor Shortcut (Hot) Keys #
The editor has preconfigured shortcut/hot keys setup to make editing faster and more efficient. Please note that these shortcut/hot keys cannot be changed. These are their pre-programmed values.
| Key Combination | Command |
| Control + C | Copies any action/set of questions/answers. |
| Control + V | Pastes items that were copied to the clipboard from the editor. |
| Control + Z | Undo the most recent change. |
| Control + Shift + Z | Redo the last command. |
| Mouse Wheel | Zooms in and out of the canvas. |
| F | Fits the canvas to screen (so all nodes are visible). |
| Spacebar (press and hold) | Allows you to move the canvas around (left click and drag while holding spacebar). |
| Left Mouse Button (press and hold) | Brings up a selection tool that allows you to highlight nodes you wish to move. You can select individual nodes or groups of nodes to move around. |
| Delete | Deletes any highlighted node(s). |
Building Checklists (Video) #
The video below also contains information from the Creating Checklists Knowledge Base article. However, it also covers how to use the node editor and what each component does.